How to Design an Off-Grid Solar System
Put the pieces together in the right order, from your daily energy to a system that works as one.
An off-grid system is only as good as its weakest match. A big battery is no use if the inverter can't draw from it. Great panels won't help if the controller can't take their voltage on a frosty morning. And a generator that's too small will stall the moment the charger and the kettle run together.
This guide puts the design steps in order and shows how each choice feeds the next. It uses two worked examples that run all the way through:
- The workshop: a small power-tool workshop, the same example used across our other guides.
- The shed: a small 12V hobby shed with lights, a radio and tool battery charging.
Every figure below is an example, not a design for your site or a product recommendation. Your loads, your location and the gear you choose will change the numbers.
1. Who this guide is for
- You're planning solar for a shed, workshop, cabin or small home with no grid connection, or you want to understand a quote before you sign it.
- You're comfortable with simple multiplication and division.
- You'll have the installation done by qualified people (see Step 9). This guide helps you plan, buy sensibly and talk to an installer. It doesn't replace one.
If you're on the grid and want backup for blackouts, see Solar Battery Backup: What Can You Run During a Blackout?.
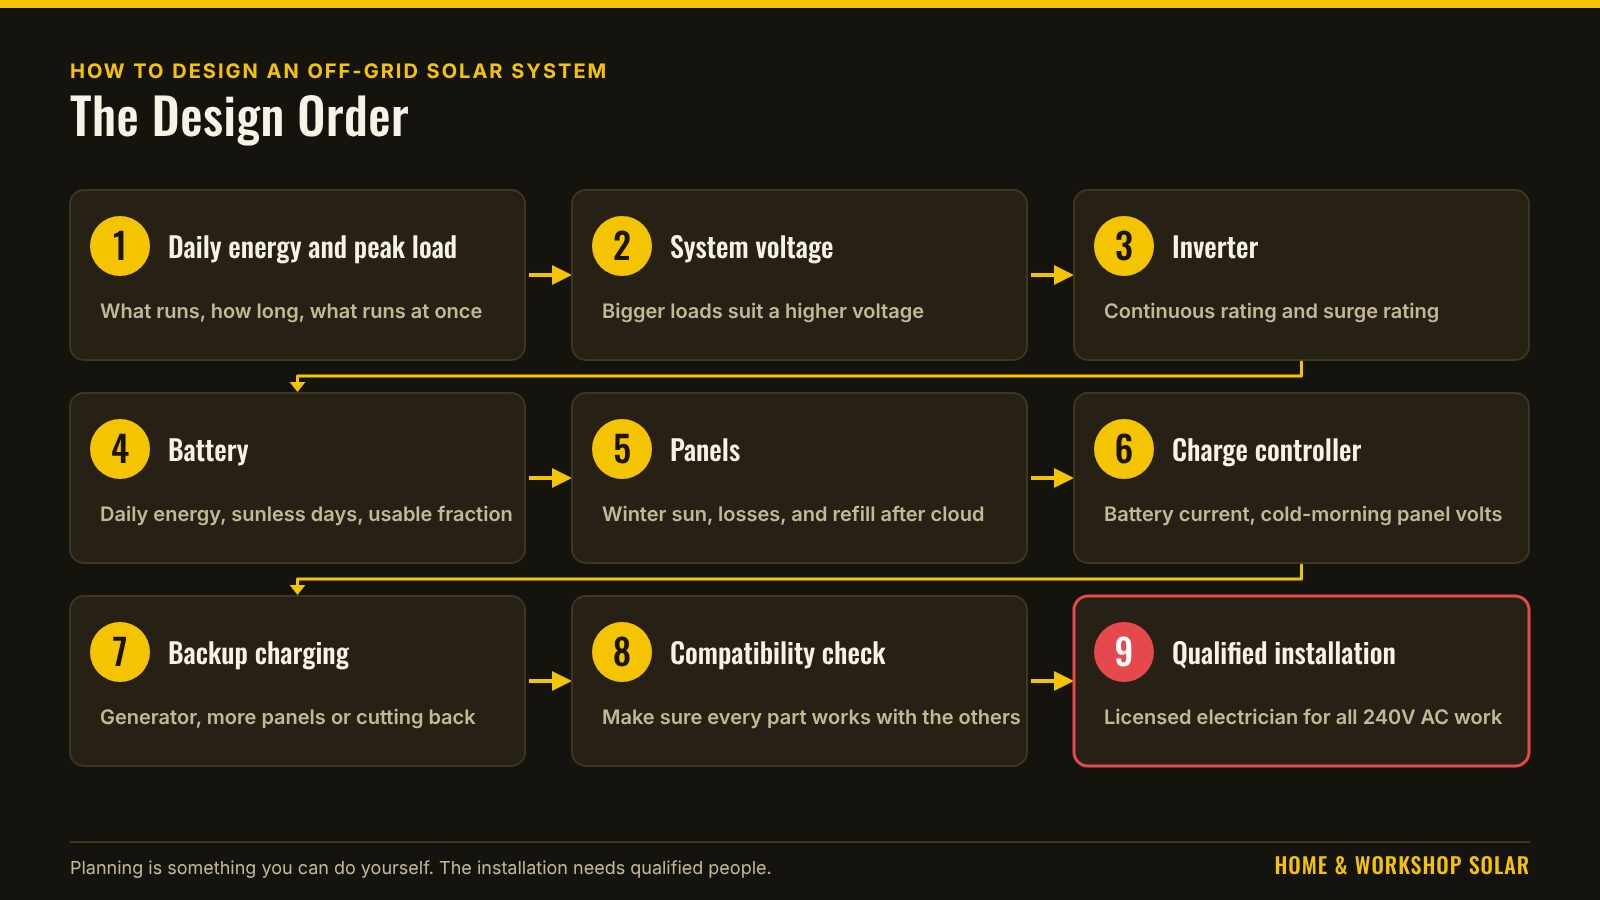
2. The design order, and why it matters
| Step | You decide | It feeds |
|---|---|---|
| 1 | Daily energy and peak load | Everything |
| 2 | System voltage | Every component |
| 3 | Inverter | Battery current, backup |
| 4 | Battery | Panels, chargers |
| 5 | Panels | Controller |
| 6 | Charge controller | Compatibility |
| 7 | Backup charging | Compatibility |
| 8 | Compatibility check | Installer |
| 9 | Qualified installation | The working system |
The order matters because each step uses the answer from the one before. The most common design mistake is to start with a product: "I've got a deal on a battery", or "this all-in-one kit looks good". Then you work backwards and find it doesn't fit your loads. Start with your loads and let them choose the gear.
Step 1: Daily energy and peak load
What you decide: how many watt-hours you use in a day, and the most watts that could run at the same moment.
- List everything you'll run, with its watts and its hours on a normal day.
- Multiply watts × hours for each item, and add them up.
- Add about 20% for losses in the inverter, battery and wiring.
- Separately, add up the watts of everything that could run at the same time. That's your peak load.
- Note your hardest-starting motor. Motors often draw two to three times their running watts for a moment when they start.
See How to Calculate Your Home or Workshop Power Needs, or use the Daily Power Needs Calculator.
| The workshop | The shed | |
|---|---|---|
| Loads | LED lights, bar fridge, laptop, drop saw, tool chargers, radio | LED lights 30W × 4h, radio 10W × 5h, tool battery charger 100W × 1h, laptop 50W × 1.3h |
| Daily energy before margin | About 1,870Wh | 335Wh |
| With 20% margin | About 2,250Wh | 402Wh, about 400Wh |
| Peak load | Saw, lights, fridge and radio: 1,950W | Charger, lights, radio and laptop: 190W |
| Hardest motor | Drop saw | None |
Common mistakes at this step:
- Using rating-plate watts × 24 hours for a fridge. Use the energy label's kWh per year ÷ 365.
- Forgetting the small things. Routers, chargers and standby loads add up over 24 hours.
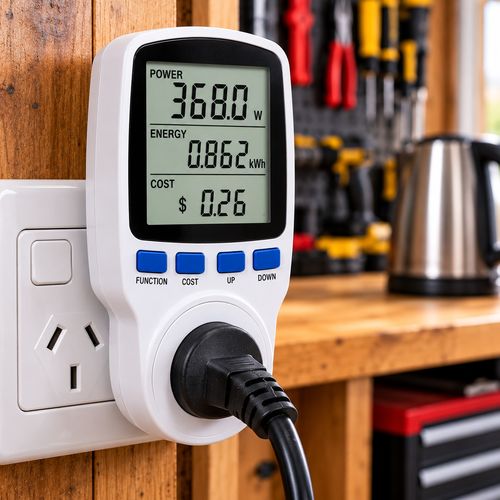
- Guessing when you could measure. A plug-in energy meter or a battery monitor beats an estimate.
Step 2: System voltage
What you decide: 12V, 24V or 48V.
For the same power, a higher voltage means less current, which means thinner cable and less energy lost as heat. Start from your peak load:
| Peak load through the inverter | Usual choice |
|---|---|
| Up to about 1,500W | 12V |
| About 1,500 to 3,000W | 24V |
| Over about 3,000W, or a system that will grow | 48V |
See 12V, 24V or 48V? Picking Your System Voltage, or use the 12V / 24V / 48V Picker.
- The workshop: 1,950W is in the 1,500 to 3,000W band, so 24V.
- The shed: 190W is well under 1,500W, so 12V. Lots of 12V gear is made for caravans, and it's cheap and easy to find.
Battery, inverter, controller and any charger must all be built for the system voltage. Changing it later usually means replacing most of them. If you think you'll grow, choose for the bigger system now.
Step 3: Inverter
What you decide: the inverter's continuous and surge ratings, the waveform, and whether it needs to be an inverter-charger.
- Continuous rating: above your peak load, with headroom.
- Surge rating: must cover your hardest-starting motor on top of everything else that's running. Check how long the surge lasts, because makers measure it differently.
- Pure sine: for an off-grid shed, workshop or home, buy pure sine. See Pure Sine vs Modified Sine Inverters.
- Inverter-charger: if you'll want a generator (Step 7), buy an inverter-charger with a generator input now. It saves replacing the inverter later. See How to Choose an Off-Grid Inverter.
Use the Inverter Size Calculator, and see Running Power Tools Off Solar for motor surges.
- The workshop: a 2,000W inverter would be at its limit at 1,950W, so a 2,500 to 3,000W pure sine inverter-charger leaves headroom.
- The shed: 190W peak, so a 300 to 500W pure sine inverter is plenty.
Battery current: the number that links Step 3 to Step 4
Battery current ≈ AC watts ÷ inverter efficiency ÷ system voltage
| Inverter fully loaded at 3,000W (90% efficiency, example) | Battery current |
|---|---|
| 12V | ≈ 278A |
| 24V | ≈ 139A |
| 48V | ≈ 69A |
This table is why big inverters belong on 24V or 48V.
- The workshop's 1,950W peak draws about 1,950 ÷ 0.9 ÷ 24 ≈ 90A. If the inverter could ever be fully loaded, plan for about 139A.
- The shed's 190W peak draws about 190 ÷ 0.9 ÷ 12 ≈ 18A.
Idle draw: the hidden load
An inverter uses power just being switched on. Check the no-load or idle figure on the data sheet. For example, a 20W idle draw (example figure, the same as in the battery bank guide) left on for 24 hours uses 20 × 24 = 480Wh a day. That's about a fifth of the workshop's daily energy, before a single tool is switched on. Add the idle draw to Step 1, and use a power-saving or search mode, or switch the inverter off, when you can.
Common mistakes at this step:
- Sizing to the running watts and forgetting the surge.
- Buying a modified sine inverter for tools and appliances that need pure sine.
- Buying an inverter only, then wanting a generator later.
- Ignoring idle draw.
Step 4: Battery
What you decide: how much energy to store, which battery, and whether it can deliver and accept the currents involved.
Rated energy needed = daily energy × days without sun ÷ usable fraction
The usable fraction (depth of discharge) comes from the battery's data sheet. Lithium iron phosphate (LiFePO4) batteries commonly allow most of their rated energy to be used. Take the real figure from the sheet.
| The workshop | The shed | |
|---|---|---|
| Daily energy | 2,250Wh | 400Wh |
| Days without sun | 2 | 2 |
| Usable fraction (example) | 0.8 | 0.8 |
| Rated energy needed | 2,250 × 2 ÷ 0.8 = 5,625Wh | 400 × 2 ÷ 0.8 = 1,000Wh |
| Example choice | Three 2,560Wh modules (25.6V 100Ah, example), 7,680Wh | One 12.8V 100Ah battery (example), 1,280Wh |
Then check the battery against the rest of the system. The current checks come straight from its data sheet:
- Continuous discharge current covers the inverter's draw from Step 3.
- Surge or peak discharge covers motor starts, for long enough.
- Maximum charge current covers all your chargers that could run together (Steps 6 and 7).
- Charging temperature range suits where the battery will live. Many LiFePO4 batteries can't be charged below about 0°C unless they have heating or low-temperature protection.
- Joining limits: how many batteries or modules the maker allows in parallel or series, and whether they must be the same model.
See How to Size a Battery Bank for an Off-Grid System and LiFePO4 Batteries Explained.
Common mistakes at this step:
- Comparing batteries by amp-hours across different voltages. Compare in watt-hours.
- Sizing for energy and forgetting current.
- Putting a lithium battery in an unheated shed without checking its charging temperature range.
- Planning to add a different battery later. Many makers don't allow mixed models.
Step 5: Panels
What you decide: how many watts of panels you need, and whether they can refill the battery after a cloudy run.
Minimum array (W) = daily energy ÷ winter peak sun hours × (1 + loss allowance)
Use winter peak sun hours for your location from a reliable solar data source. The examples use 3 hours and a 30% loss allowance, both example figures.
| The workshop | The shed | |
|---|---|---|
| Minimum array | 2,250 ÷ 3 × 1.3 = 975W | 400 ÷ 3 × 1.3 ≈ 173W |
| Smallest sensible choice | Three 400W panels, 1,200W | One 200W panel |
The refill check: the step most people miss
An array that just covers a winter day keeps up on sunny days, but it can't refill a battery you've drained over a few cloudy days. Only the energy left over after the day's use goes back into the battery.
- Winter output (Wh a day) = array W × sun hours ÷ (1 + loss)
- Days to refill = energy to put back ÷ (winter output − daily energy)
| Example | Array | Winter output | Surplus | Energy to put back (2 days) | Days to refill |
|---|---|---|---|---|---|
| Workshop | 1,200W | ≈ 2,770Wh | ≈ 520Wh | 4,500Wh | ≈ 8.7 days |
| Workshop | 1,600W | ≈ 3,690Wh | ≈ 1,440Wh | 4,500Wh | ≈ 3.1 days |
| Shed | 200W | ≈ 460Wh | ≈ 60Wh | 800Wh | ≈ 13 days |
| Shed | 400W | ≈ 920Wh | ≈ 520Wh | 800Wh | ≈ 1.5 days |
In both examples, one extra panel turns a recovery of a week or more into a few days. Panels are usually the cheapest part of the system to add. Alternatively, keep the smaller array and plan on a generator (Step 7) for recovery.
See What Size Solar System Do I Need? and the Solar Array Size Calculator.
Common mistakes at this step:
- Using summer sun hours.
- Skipping the refill check.
- Ignoring shading. A shaded panel can drag down a whole string.
Step 6: Charge controller
What you decide: a controller (usually MPPT for anything but the smallest systems) that suits both the current to the battery and the panels' voltage.
Current: array watts ÷ system voltage, plus a margin.
- The workshop: 1,600 ÷ 24 ≈ 67A before margin, or about 80A with a 20% margin.
- The shed: 400 ÷ 12 ≈ 33A before margin, or about 40A with 20%.
Voltage: panels in series add their voltages, and panel voltage rises on cold mornings. The cold-morning string voltage must stay under the controller's maximum PV input voltage. That limit is absolute: going over it can destroy the controller.
Cold-morning voltage = panel Voc × panels in series × (1 + temperature coefficient ÷ 100 × (coldest °C − 25))
Illustration: this uses the default example panel in our MPPT calculator (Voc 37V, coefficient −0.28% per °C). It isn't a real product.
- Two in series on a 0°C morning: 37 × 2 × (1 + (−0.28 ÷ 100) × (0 − 25)) ≈ 79.2V.
- That's still under 120V DC, which matters: a string over 120V DC is no longer extra-low voltage, and must be wired by a licensed electrician.
Also check the controller's maximum PV short-circuit current, and that it has a charging profile for your battery chemistry. All-in-one inverter-chargers with a built-in MPPT need exactly the same checks.
Use the MPPT Controller Size Calculator with your real panel's label figures, and see PWM vs MPPT Charge Controllers.
Common mistakes at this step:
- Checking only the amps, and not the cold-morning voltage.
- Using the panel's Vmp instead of its Voc for the voltage limit.
- Leaving the controller on a lead-acid profile with a lithium battery.
Step 7: Backup charging
What you decide: how you'll get through the worst weeks. The options are a generator, extra panels, a bigger battery, or cutting back.
For a generator feeding an inverter-charger:
Generator continuous rating ≥ (charge current × charging voltage ÷ charger efficiency) + loads running at the same time
The workshop:
- Charging at 60A × about 28V ≈ 1,680W.
- ÷ 0.9 ≈ 1,870W from the generator for charging.
- Plus 1,000W of loads ≈ 2,870W, so a generator above about 2,900W continuous.
- Refilling 4,500Wh at 1,680W takes at least 2.7 hours, and longer in practice because charging slows near full.
The shed: at 400Wh a day with 400W of panels, a generator may not be needed. A small portable charger, or simply easing off on a long grey spell, may do.
Most inverter-chargers let you set an AC input current limit to stop them overloading the generator. Check the manual. See Generator Backup for an Off-Grid Solar System.
Common mistakes at this step:
- Sizing the generator to its peak rating instead of its continuous rating.
- Forgetting the loads that run while it charges.
- Not setting the AC input limit.
Step 8: Compatibility check
This is where many DIY designs go wrong. Before you buy, check every match against a document, such as a manual, data sheet or compatibility list, not against a seller's listing:
- ☐ Voltages: battery, inverter, controller and any charger are all built for the system voltage.
- ☐ Charging profiles: every charging source has a profile that suits the battery maker's requirements.
- ☐ Currents: the battery's continuous and surge ratings cover the inverter, and its charge rating covers all chargers together.
- ☐ Panels and controller: the cold-morning voltage and short-circuit current are within the controller's limits.
- ☐ Battery communication: a battery with a data link is on the inverter's compatibility list, or the other way round.
- ☐ Generator: suits the inverter-charger's input (waveform, voltage and current limit).
- ☐ Temperature: every item suits where it will live, especially lithium charging in the cold.
- ☐ Manuals agree: many inverter and battery makers publish lists of compatible equipment. Use them.
Step 9: Qualified installation
Planning is something you can do yourself. The installation needs to be done properly:
- 240V AC wiring: any work on it, including connecting the inverter to a switchboard or fixed wiring, must be done by a licensed electrician.
- Panel strings: strings over 120V DC must be wired by a licensed electrician.
- Battery banks: a battery bank can deliver a huge current into a short circuit. Cable sizes, protection and isolation must follow the makers' instructions and the relevant standards, and should be chosen and installed by a qualified installer. This guide deliberately gives no cable, fuse or breaker sizes.
- Take your numbers: bring your figures from Steps 1 to 7 to the installer. A good installer will check them and may change them. The worksheet's handover page is made for this.
10. The two examples, side by side
| Part | The workshop | The shed |
|---|---|---|
| Daily energy | 2,250Wh | 400Wh |
| Peak load | 1,950W | 190W |
| System voltage | 24V | 12V |
| Inverter | 2,500 to 3,000W pure sine inverter-charger | 300 to 500W pure sine |
| Battery current at peak | ≈ 90A | ≈ 18A |
| Battery | About 5.6kWh needed; three example modules, 7.7kWh | About 1kWh needed; one example 12.8V 100Ah, 1.28kWh |
| Panels | 1,200 to 1,600W | 200 to 400W |
| Controller | ≈ 67A before margin, at 24V | ≈ 33A before margin, at 12V |
| Backup | Generator above about 2,900W continuous | Possibly none |
These are planning estimates only, not a system design, wiring specification or safety assessment.
11. Design troubleshooting: when the numbers don't work
| Problem in your plan | Likely cause | What to try |
|---|---|---|
| Battery current is huge (hundreds of amps) | System voltage too low for the load | Move up to 24V or 48V (Step 2) |
| Battery is enormous and expensive | Too many days without sun, or high daily energy | Cut loads, plan a generator, or accept fewer days |
| Refill takes a week or more | Array only just covers a winter day | Add panels, or plan generator recovery |
| Cold-morning voltage is over the controller limit | Too many panels in series | Fewer in series, more strings, or a controller with a higher input limit |
| Generator would be overloaded | Charger and loads together exceed its continuous rating | Lower the charger current or AC input limit, or use a larger generator |
| Inverter idle draw is a big share of daily energy | Large inverter left on all day | Power-saving mode, a timer, or switching it off |
| Battery can't charge on winter mornings | Charging temperature limit | A heated model, a warmer location, or delayed charging |
12. Mistakes that cost the most
- Starting with a product instead of the loads.
- Choosing 12V for a big inverter.
- Sizing the panels for summer.
- Skipping the refill check.
- Checking the controller's amps but not its voltage.
- Forgetting inverter idle draw.
- Buying parts that don't talk to each other, such as battery communication and charging profiles.
- DIY wiring that needs a licence.
13. Frequently asked questions
Can I design my own off-grid system?
You can plan it, and this guide and the worksheet are made for that. The installation, including anything on 240V AC wiring or panel strings over 120V DC, must be done by licensed and qualified people.
Should I buy an all-in-one inverter-charger?
It makes a neat install. Check its built-in solar controller limits (voltage, current and power) exactly as you would a separate controller, and check that the battery is on its compatibility list.
How many days without sun should I plan for?
It's a trade-off between cost and convenience. Two days is a common starting point for a workshop. More days mean a bigger battery and more panels to refill it, or a generator.
Is 48V always better?
Not for a small shed. 48V suits bigger systems. A 200W shed is simpler and cheaper at 12V.
Can I add more batteries later?
Only within the maker's rules. Many require the same model, and some don't allow new modules to be added to an old bank. Plan for growth now if you can.
Do I need a generator?
Not always. Extra panels often solve winter recovery more cheaply. A generator makes sense for long grey spells, heavy winter loads or a system that must never go flat.
14. Quick summary
- Start with your loads: daily energy and peak.
- Pick the system voltage, then match everything to it.
- Size the inverter for the peak and surge, and remember idle draw.
- Size the battery for energy and current.
- Size the panels for winter and for refilling.
- Check the controller's current and its cold-morning voltage.
- Plan your backup, check compatibility against documents, and have it installed by qualified people.
Safety: in Australia, any work on 240V AC wiring, including connecting an inverter, battery or solar system to a home's switchboard or fixed wiring, must be done by a licensed electrician. Grid-connected systems also need approval from your electricity network.
Handy gear
These are examples to compare, not a recommendation for your home. Check any model's data sheet against this guide.
As an Amazon Associate I earn from qualifying purchases. Prices and availability are shown on Amazon.
Related guides
How to Calculate Your Home or Workshop Power Needs
The first step for any solar system: list what you run, how long for, and turn it into the daily energy your system has to supply.
Read guide →
12V, 24V or 48V? Picking Your System Voltage
Why system voltage matters, how it changes the current and cable size, and which voltage suits a shed, workshop or home.
Read guide →